- Home›
- Healthy Living›
- 7 Effective Yoga Asanas To Treat Neck Pain
7 Effective Yoga Asanas To Treat Neck Pain
By: Priyanka Maheshwari Fri, 11 Aug 2023 3:50:13

Neck pain is a common and often discomforting condition that affects a significant portion of the population at some point in their lives. It typically refers to any pain or discomfort experienced in the area of the neck, which includes the cervical spine and surrounding muscles, ligaments, and nerves. This condition can range from mild discomfort to severe pain, and it may be acute (sudden onset) or chronic (lasting for an extended period).
The causes of neck pain can vary widely and may include:
- Muscle Strain: Overuse, poor posture, or sudden movements can strain the muscles in the neck, leading to pain and stiffness.
- Poor Ergonomics: Prolonged use of computers, phones, or other devices with improper posture can contribute to neck pain.
- Injury: Accidents, falls, or sports-related injuries can lead to neck pain by affecting the muscles, ligaments, or even the cervical spine itself.
- Herniated Discs: The discs between the vertebrae can bulge or herniate, putting pressure on nearby nerves and causing pain.
- Arthritis: Conditions like osteoarthritis or rheumatoid arthritis can cause inflammation and pain in the neck joints.
- Degenerative Disc Disease: Over time, the discs between the vertebrae can wear down, leading to pain and reduced mobility.
- Nerve Compression: Conditions like cervical radiculopathy occur when nerves in the neck are compressed or irritated, causing pain to radiate down the arm.
- Medical Conditions: Certain medical conditions, such as fibromyalgia, may result in widespread pain that includes the neck.
- Stress and Tension: Emotional stress and tension can lead to muscle tightness and discomfort in the neck region.
The symptoms of neck pain can vary and might include aching, stiffness, sharp pain, limited range of motion, headaches, and even pain radiating down the arms. Management and treatment approaches depend on the underlying cause and severity of the pain. Conservative treatments may involve rest, gentle exercises, physical therapy, applying ice or heat, and over-the-counter pain medications. For more serious cases, medical intervention, such as prescription medications, injections, or in rare cases, surgery, might be recommended.
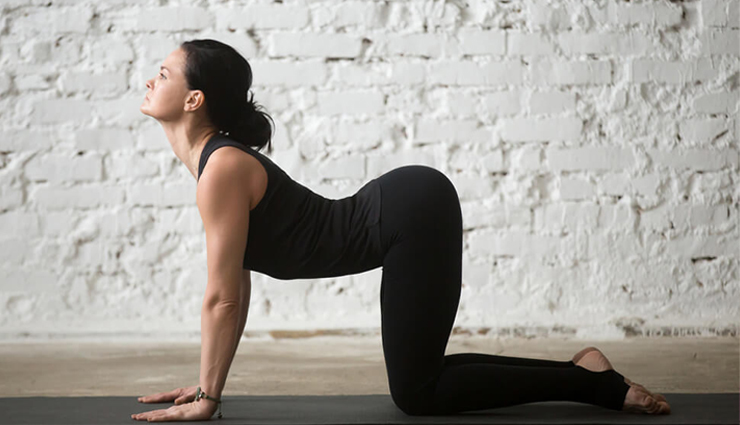
# Cat-Cow Pose
Starting Position:
- Begin on your hands and knees, positioning your wrists directly under your shoulders and your knees directly under your hips. Your fingers should be spread wide for stability.
Cow Pose (Inhale):
- Inhale deeply as you gently arch your back. Lift your tailbone and pelvis toward the ceiling, allowing your belly to sink toward the floor. Your head and neck should be aligned with your spine, looking straight ahead or slightly upward.
Transition to Cat Pose (Exhale):
- As you exhale, round your back like a cat, dropping your head and tailbone. Draw your navel toward your spine, creating a gentle curve in your upper back. This is the Cat Pose.
Flowing Movement:
- Inhale as you transition back to Cow Pose by lifting your tailbone and arching your back, looking forward or slightly up.
- Exhale as you move back to Cat Pose, rounding your back and tucking your chin to your chest.
Repeat:
- Continue this gentle flowing movement, syncing your breath with your motion.
- Inhale for Cow Pose and exhale for Cat Pose. Move through the poses for several rounds, allowing the movement to become fluid and soothing.
Awareness and Comfort:
- Pay attention to how your spine feels during each movement. If you have any injuries or discomfort, modify the poses to suit your body's needs.
Duration:
You can practice the Cat-Cow Pose for a few minutes, gradually increasing the duration as you become more comfortable with the motion.
Benefits of Cat-Cow Pose:
- Improves spinal flexibility and mobility.
- Helps release tension and stress in the back and neck.
- Promotes a healthy range of motion in the spine.
- Encourages deep breathing and relaxation.
Remember:
- Focus on the fluidity of the movement and the synchronization of your breath.
- Listen to your body and avoid forcing the poses. Move gently and within your comfort zone.
- If you have any spine or neck injuries or conditions, consult a healthcare professional before practicing Cat-Cow Pose or any other yoga poses.
- The Cat-Cow Pose is often used as part of a warm-up or cool-down sequence in yoga practices, and it can also be practiced on its own for relaxation and flexibility benefits.
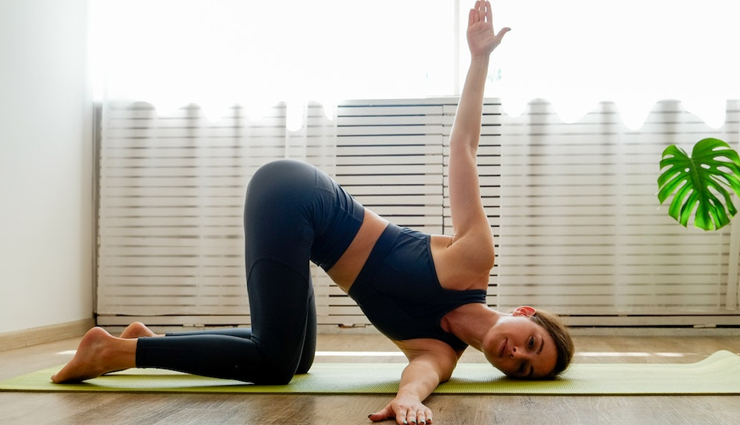
# Thread the Needle Pose
Starting Position:
- Begin on your hands and knees in a tabletop position, with your wrists aligned under your shoulders and your knees under your hips.
Slide Your Arm:
- Inhale and lift your right arm toward the ceiling, opening your chest and twisting your upper body slightly.
Thread Your Arm:
- Exhale as you gently slide your right arm under your left arm, reaching toward the left side of your mat. Your right shoulder and ear should rest on the mat or as close to the mat as comfortable. Your left hand remains on the ground for support.
Stretch and Relax:
- Feel the stretch along your right shoulder blade and the upper back. Keep your hips aligned and facing forward.
Hold and Breathe:
- Hold the pose for several breaths, allowing your body to relax into the stretch. Breathe deeply and consciously, feeling the expansion and release with each breath.
Switch Sides:
- To come out of the pose, gently press your left hand into the mat and lift your right arm back up. Return to the tabletop position.
- Repeat the steps for the other side by lifting your left arm, threading it under the right arm, and finding the stretch on the left side.
Duration:
- You can hold Thread the Needle Pose for about 5 to 10 deep breaths on each side.
Benefits of Thread the Needle Pose:
- Relieves tension in the shoulders, upper back, and neck.
- Stretches and opens the muscles around the shoulder blades.
- Encourages gentle spinal rotation and flexibility.
Provides a relaxing and soothing sensation.
Remember:
- Move slowly and mindfully into the pose, avoiding any sudden or jerky movements.
- If you have any shoulder injuries or conditions, modify the pose by not lowering the arm too much or consult a healthcare professional before attempting it.
- Listen to your body and adjust the depth of the stretch to match your comfort level.
- Thread the Needle Pose is often used as part of a yoga sequence or as a stand-alone stretch to release upper body tension.
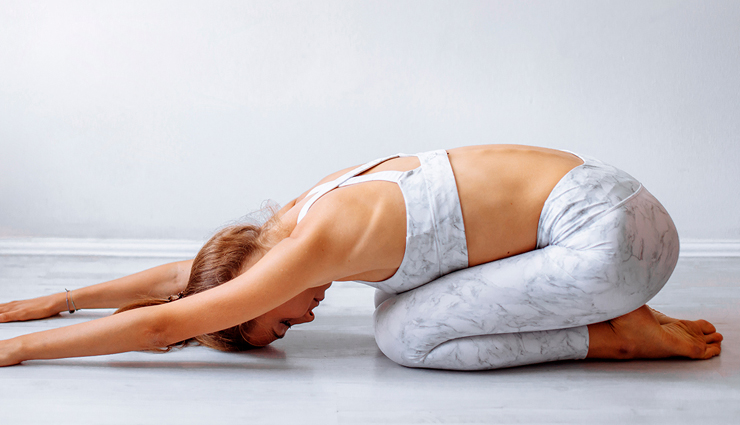
# Child's Pose
Starting Position:
- Begin on your hands and knees in a tabletop position, with your wrists under your shoulders and your knees under your hips.
Knee Width:
- Widen your knees slightly, about hip-width apart or slightly wider. This will create space for your torso to rest between your thighs.
Toes Together:
- Bring your big toes to touch each other, allowing your heels to open up.
Sit Back:
- As you exhale, start to sit your hips back toward your heels. Your buttocks will come to rest on your heels or as close as comfortable.
Extend Arms:
- Extend your arms forward on the mat, reaching your hands out as far as possible. Your forehead can rest on the mat.
Relax and Breathe:
- Let your chest sink toward the ground and feel the stretch in your lower back, hips, and shoulders.
- Close your eyes if you're comfortable and take slow, deep breaths. Feel your back expand with each inhalation and soften with each exhalation.
Hold and Rest:
- Stay in Child's Pose for as long as you find it comfortable. You can hold the pose for a few breaths or several minutes.
Coming Out of the Pose:
- To come out of the pose, gently walk your hands back toward your body and slowly sit up on your heels.
Benefits of Child's Pose:
- Releases tension in the back, shoulders, and hips.
- Stretches and relaxes the muscles along the spine.
- Calms the mind and helps reduce stress and anxiety.
- Rests and rejuvenates the body during yoga practice.
Remember:
- If you have knee issues, you can place a folded blanket or cushion between your buttocks and heels for added comfort and support.
- Child's Pose is a resting pose, so listen to your body and adjust the depth of the stretch to your comfort level.
- Incorporate Child's Pose into your yoga practice as a way to rest, relax, and find balance between more active poses.
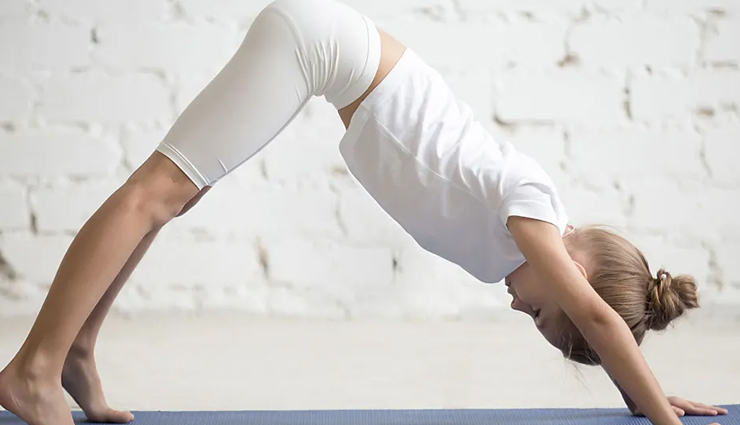
# Downward-Facing Dog
Starting Position:
- Begin on your hands and knees in a tabletop position, with your wrists directly under your shoulders and your knees under your hips.
Spread Fingers:
- Spread your fingers wide and press your palms firmly into the mat. Your fingers should be pointing forward and slightly turned outward.
Tuck Toes:
- Tuck your toes under and lift your knees off the ground, straightening your legs to create an inverted V shape with your body.
Lengthen Spine:
- Press through your palms and lift your sit bones toward the ceiling, creating space and length in your spine.
Engage Core:
- Engage your core muscles by drawing your navel toward your spine. This will help support your lower back and maintain stability in the pose.
Heels Towards the Ground:
- While keeping your legs as straight as possible, work on pressing your heels toward the ground. It's okay if your heels don't touch the ground; the goal is to feel a stretch in your hamstrings and calves.
Head and Neck Position:
- Keep your head between your upper arms, allowing your neck to be relaxed. Gaze back toward your legs or at your feet.
Hold and Breathe:
- Hold the pose for several breaths, taking deep inhales and exhales. Feel the stretch in your shoulders, hamstrings, and back.
Transitioning Out:
- To come out of the pose, bend your knees and lower them back down to the mat. Return to the tabletop position.
Benefits of Downward-Facing Dog:
- Stretches and lengthens the spine, hamstrings, and calves.
- Strengthens the shoulders, arms, and core muscles.
- Improves circulation and blood flow throughout the body.
- Offers an inversion that can help calm the mind and relieve stress.
Remember:
- If you're new to yoga or have wrist issues, you can use yoga blocks under your palms or slightly bend your knees to take some pressure off your wrists.
- If you have tight hamstrings, it's okay if your heels don't touch the ground. Over time, with consistent practice, your flexibility may improve.
- Downward-Facing Dog is a common pose in yoga sequences and is often used as a resting position between more challenging poses.
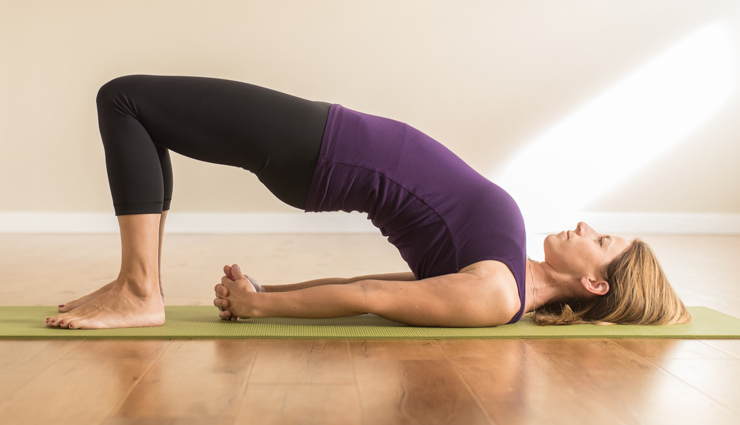
# Bridge Pose
Starting Position:
- Lie on your back on a comfortable surface, such as an exercise mat. Bend your knees and place your feet flat on the floor, hip-width apart. Your arms should rest by your sides, palms facing down.
Foot Placement:
- Make sure your feet are positioned close to your buttocks, and your heels are within reach of your fingertips.
Engage Core:
- Gently engage your core muscles to stabilize your lower back.
Lift Your Hips:
- Inhale and press through your feet, lifting your hips and lower back off the mat. Keep your feet and arms grounded to help lift your body.
Rolling Your Spine:
- Continue lifting your hips until your thighs and torso form a straight line. Your weight should be distributed evenly across your shoulders, upper arms, and feet.
Interlace Your Fingers:
- You can interlace your fingers beneath your lifted body, pressing your arms into the mat for additional support.
Chest and Chin Position:
- Roll your shoulders under slightly to open your chest. Keep your chin slightly tucked, and your neck relaxed.
Hold and Breathe:
- Hold the pose for several deep breaths, feeling a gentle stretch across your chest, hips, and thighs.
Lowering Down:
- Exhale as you slowly lower your hips and spine back down to the mat, one vertebra at a time.
Relax:
- Release your interlaced fingers and allow your arms to rest by your sides.
Benefits of Bridge Pose:
- Stretches the chest, neck, and spine.
- Strengthens the back, glutes, and hamstrings.
- Helps alleviate stress and mild depression.
- Can stimulate abdominal organs and improve digestion.
Remember:
- Avoid overextending your neck by keeping your chin slightly tucked.
- If you have neck issues or discomfort, you can keep your arms beside your body instead of interlacing them.
- Bridge Pose is often included in yoga sequences and can be modified or advanced based on your level of flexibility and experience.
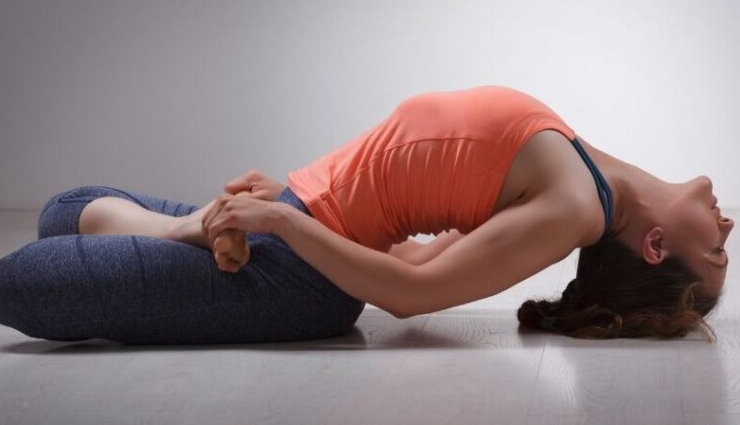
# Fish Pose
Starting Position:
- Begin by lying flat on your back on an exercise mat or a comfortable surface. Extend your legs and place your arms alongside your body, palms facing down.
Hands Under Hips:
- Slide your hands palms-down underneath your hips, positioning them under your buttocks. Your palms should be facing down and your forearms should be tucked slightly under your body.
Lift the Chest:
- Inhale and press down into your forearms and elbows, lifting your chest and upper body off the mat. This action will create a gentle arch in your upper back.
Tilt the Head Back:
- Tilt your head back, allowing the crown of your head to rest lightly on the mat. Your gaze can be directed toward the back or overhead.
Lift the Chest Higher:
- Push through your forearms and elbows to lift your chest even higher. This will create a gentle stretch across your chest and throat.
Relax the Neck:
- Keep your neck relaxed and avoid putting excessive pressure on the cervical spine.
Hold and Breathe:
- Hold the pose for several breaths, feeling the opening in your chest and throat. Breathe deeply and calmly.
Release and Lower Down:
- Exhale as you slowly release the pose by lowering your upper body and head back down to the mat.
Relax:
- Extend your arms and legs, taking a few moments to relax in a neutral position before transitioning to the next pose.
Benefits of Fish Pose:
- Stretches and opens the chest, throat, and shoulders.
- Strengthens the muscles of the upper back and neck.
- Improves spinal flexibility and posture.
- Can help alleviate fatigue and tension in the upper body.
Remember:
- If you have neck or back issues, you can place a folded blanket or cushion under your upper back and head for support and comfort.
- Avoid excessive pressure on the neck and cervical spine.
- Fish Pose is often practiced near the end of a yoga session to counterbalance forward folding poses. It's important to listen to your body and avoid any discomfort or strain.
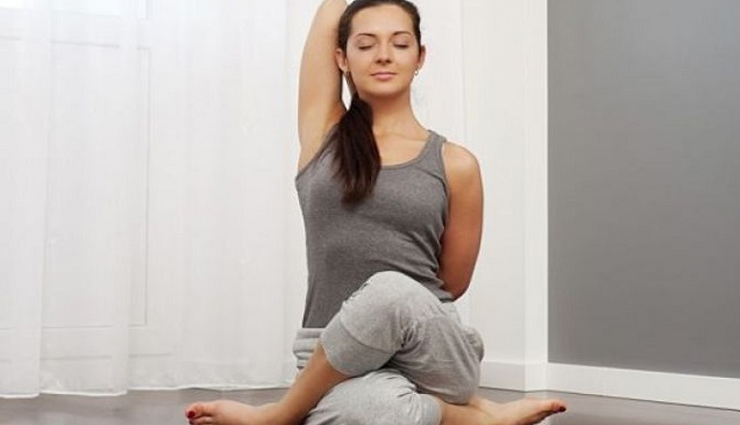
# Cow-Face Pose
Starting Position:
- Begin by sitting on an exercise mat with your legs extended in front of you.
Cross the Legs:
- Bend your knees and cross your right leg over your left, stacking your right knee on top of your left knee. Your feet should be positioned to the sides of your hips.
Feet Alignment:
- If possible, try to align your heels with each other. If your hips are tight, it's okay if there's some space between your feet.
Sit on a Prop (Optional):
- If you have difficulty sitting comfortably on the floor, you can sit on a folded blanket or cushion to elevate your hips.
Arms Behind the Back:
- Stretch your left arm straight up toward the ceiling. Then, bend your left elbow and bring your left hand behind your back, reaching toward your upper back.
Right Arm Position:
- Reach your right arm out to the right side and bend your elbow, bringing your right hand behind your back. Try to clasp your fingers together, with your right fingers holding the left fingers.
Stretch and Lift:
- If you can't clasp your hands, you can hold onto a strap or a piece of cloth. Gently pull your hands in opposite directions to create a stretch in your shoulders and chest.
Straighten Your Spine:
- Sit up tall and lengthen your spine. Avoid rounding your back.
Hold and Breathe:
- Hold the pose for several breaths, feeling the stretch across your hips, shoulders, and chest.
Release and Switch Sides:
- Gently release your arms and uncross your legs. Straighten your legs and give them a little shake if needed. Then, switch the cross of your legs and repeat the pose on the other side.
Benefits of Cow-Face Pose:
- Stretches the hips, thighs, shoulders, and chest.
- Promotes flexibility in the shoulders and hips.
- Helps improve posture by opening the chest.
- Can alleviate tension and discomfort in the upper body.
Remember:
- If you can't clasp your hands behind your back, use a strap or cloth to hold onto instead.
- Take your time and don't force your body into the pose. Flexibility will gradually improve with consistent practice.
- Cow-Face Pose can be practiced as part of a yoga routine or as a standalone stretch. Listen to your body and modify as needed to ensure your comfort and safety.


