- Home›
- Healthy Living›
- 8 Yoga Asanas To Get Relief From Tinnitus
8 Yoga Asanas To Get Relief From Tinnitus
By: Priyanka Maheshwari Sun, 01 Oct 2023 3:20:31

Tinnitus is a common and often distressing medical condition characterized by the perception of ringing, buzzing, hissing, or other phantom sounds in the ears when there is no external source of these noises. This auditory sensation can vary in intensity and frequency, and it may be experienced in one or both ears. Tinnitus is not a disease itself but rather a symptom of an underlying issue, and it can be temporary or chronic.
The sensation of tinnitus can be highly subjective, with individuals describing it in various ways, such as a high-pitched whine, a low-frequency rumble, or a continuous noise resembling crickets or cicadas. It can be constant or intermittent, and its impact on a person's life can range from mild annoyance to severe disruption, affecting sleep, concentration, and overall quality of life.
Tinnitus can have numerous potential causes, including exposure to loud noises, age-related hearing loss, earwax blockages, ear infections, head injuries, and certain medications. It can also be associated with underlying medical conditions like Meniere's disease or temporomandibular joint (TMJ) disorders. Understanding and managing tinnitus often requires a comprehensive evaluation by a healthcare professional to identify its root cause and develop appropriate treatment strategies.
While there is no universal cure for tinnitus, various management techniques and treatments are available to alleviate its symptoms and improve the quality of life for those affected. These may include hearing aids, sound therapy, cognitive-behavioral therapy, and lifestyle modifications. Coping with tinnitus can be challenging, but with the right support and interventions, many individuals can find relief and learn to manage this persistent condition effectively.
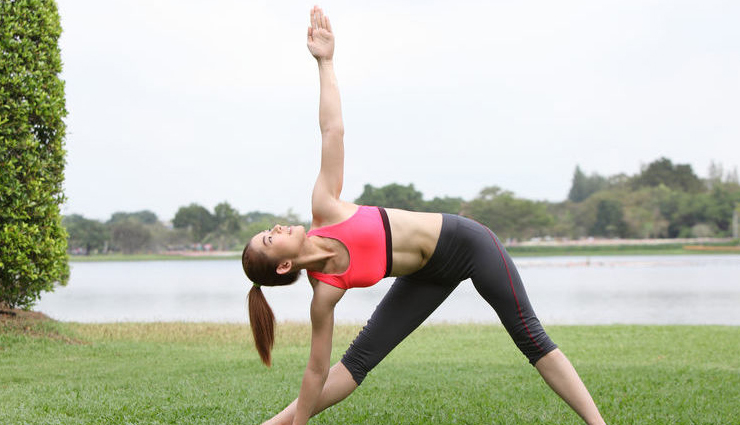
# Trikonasana
Step 1: Stand straight with your feet about 3-4 feet apart, depending on your comfort. Your feet should be parallel to each other.
Step 2: Inhale deeply and raise your arms sideways, so they are parallel to the ground, with palms facing down.
Step 3: Exhale and bend your body to the right from your waist, keeping your waist straight. Try to touch your right foot with your right hand. Your left hand should be pointing upwards, in line with your right hand. Keep your chest and shoulders wide open.
Step 4: Hold the position for a few breaths. Your left hip should be pushed slightly forward and your right hip slightly backward.
Step 5: Inhale and come back to the upright position with arms parallel to the ground.
Step 6: Now, exhale and bend your body to the left from your waist, trying to touch your left foot with your left hand. Your right hand should be pointing upwards, in line with your left hand. Keep your chest and shoulders wide open.
Step 7: Hold the position for a few breaths. Your right hip should be pushed slightly forward and your left hip slightly backward.
Step 8: Inhale and come back to the upright position.
Step 9: Exhale and bring your arms down to your sides, returning to the starting position.
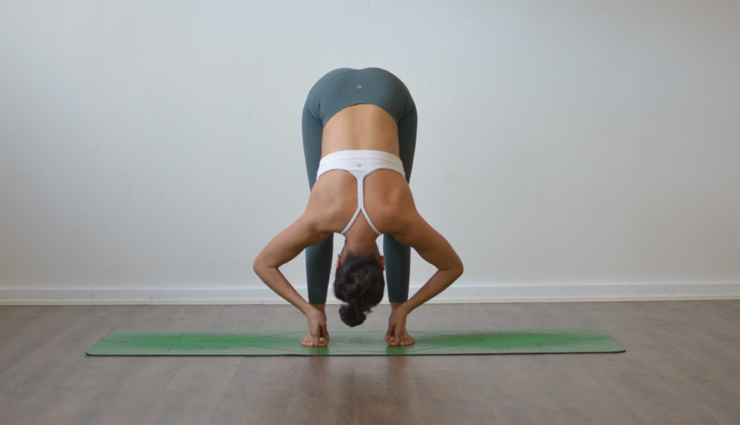
# Padangusthasana
Steps 1: Begin by standing tall with your feet together. Engage your thighs and lift your kneecaps. Balance your weight evenly on both feet. Keep your spine straight and shoulders relaxed.
Steps 2: Inhale deeply as you raise your arms overhead, reaching towards the ceiling. Keep your arms straight and your biceps close to your ears. Lengthen your spine.
Steps 3: Exhale slowly as you hinge at your hips and bend forward from your waist. Keep your back straight as you descend. Bend your knees slightly if you feel tightness in your hamstrings.
Steps 4: Bring your hands down and hold your big toes with your index and middle fingers. You can also hold your shins or ankles if you can't reach your toes. Use your thumb to wrap around the big toe and secure your grip.
Steps 5: Inhale and lift your torso slightly, lengthening your spine. Look forward and straighten your arms as much as possible. Keep your back flat.
Steps 6: With each exhalation, deepen the stretch by pulling your torso closer to your legs. Keep your elbows pointing out to the sides.
Steps 7: Hold Padangusthasana for a few breaths, breathing deeply and relaxing into the stretch. Feel the elongation in your spine and the stretch in your hamstrings.
Steps 8: To release the pose, slowly release your toes and bring your hands to your hips. Inhale as you lift your torso, keeping your back straight. Come up to the standing position with your arms overhead.
Steps 9: Exhale as you lower your arms to your sides, returning to Tadasana.
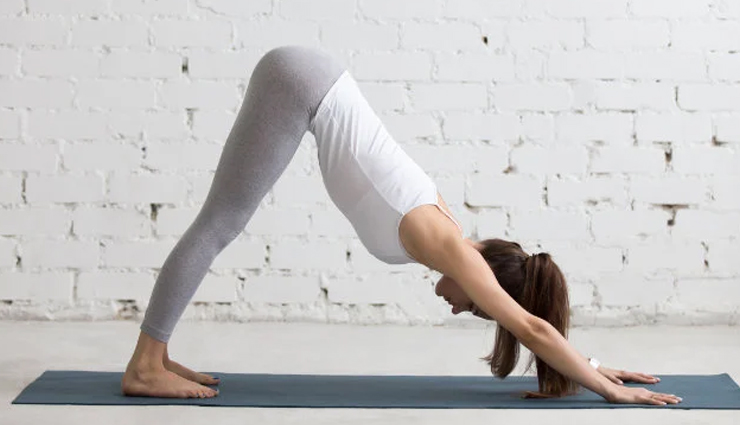
# Adho Mukha Svanasana
Steps 1: Begin on your hands and knees, forming a tabletop position. Your wrists should be aligned under your shoulders, and your knees should be under your hips.
Steps 2: Spread Your Fingers Wide:
Spread your fingers wide apart and press firmly into the ground with your palms. Root down through your knuckles and the base of your fingers.
Steps 3: Tuck your toes under, preparing to lift your hips up. As you do this, keep your hands shoulder-width apart and your feet hip-width apart.
Steps 4: Exhale and straighten your legs, lifting your hips toward the ceiling. Your body will form an inverted V shape. Press your heels toward the floor, but it's okay if they don't touch the ground, especially if you're a beginner.
Steps 5: Keep your head between your arms, facing down. Your ears should be aligned with your upper arms. Relax your neck and let your head hang freely.
Steps 6: While keeping your spine long, straighten your arms and legs as much as your flexibility allows. It's more important to maintain a straight spine than to touch the floor with your heels.
Steps 7: Engage your quadriceps to lift your thighs upward. Imagine pushing the front of your thighs toward the ceiling while pressing your heels down.
Steps 8: Lengthen your spine by reaching your tailbone toward the ceiling and drawing your chest toward your thighs. Create a straight line from your wrists to your hips.
Steps 9: Hold Adho Mukha Svanasana for a few breaths, breathing deeply. Focus on relaxing your neck and shoulders while maintaining the stretch in your legs and spine.
Steps 10: To release, bend your knees and lower your hips back to the tabletop position. You can rest in Child's Pose (Balasana) to relax your back after practicing Downward Facing Dog.
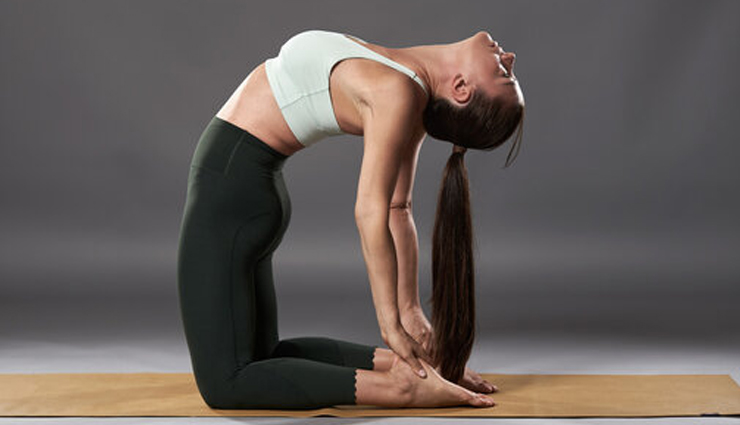
# Ustrasana
Steps 1: Begin by sitting on your heels in Vajrasana, with your knees and feet together. Keep your spine straight and place your hands on your hips to support your lower back.
Steps 2: Press the tops of your feet into the ground to engage your thigh muscles. This will provide a stable foundation for the backbend.
Steps 3: Inhale and place your hands on your lower back, fingers pointing down. Keep your elbows close together.
Steps 4: As you exhale, start to arch your back, gently pushing your hips forward. Keep your chest lifted and your shoulder blades pressing into your back.
Steps 5: Reach your hands back, one at a time, to hold onto your heels. If reaching your heels is challenging, you can keep your hands on your lower back for support.
Steps 6: If your neck feels comfortable, tilt your head back, allowing it to hang. Be mindful of your neck; don't strain it. If it's difficult to tilt your head back, you can keep it in a neutral position.
Steps 7: Hold the pose for a few breaths, breathing deeply and maintaining the arch in your back. Keep your thighs engaged and continue pressing your hips forward.
Steps 8: To come out of the pose, bring your hands back to your lower back for support. Slowly lift your torso upright, returning to Vajrasana. Take a moment to rest and breathe before moving on.
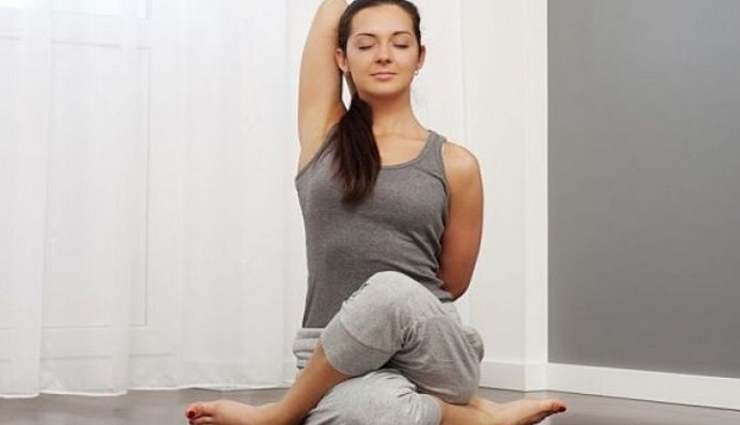
# Gomukhasana
Steps 1: Sit on the floor with your legs extended straight in front of you. Keep your spine erect and your shoulders relaxed.
Steps 2:Bend your knees and place your feet on the floor. Slide your left foot under your right knee and bring it to the outside of your right hip. Then, stack your right knee on top of the left knee.
Steps 3: Ensure that both sitting bones are rooted firmly on the ground. Your hips should be squared and aligned.
Steps 4: Inhale and raise your right arm toward the ceiling, then bend your elbow and reach your hand down your back, palm facing outward.
Steps 5: Inhale and lift your left arm to the side, parallel to the floor. Then, bend your left elbow and bring your hand up your back, palm facing inward.
Steps 6: Try to clasp your fingers behind your back. If your hands don't reach, you can use a yoga strap or a cloth to bridge the gap between your hands. Hold onto the strap with your right hand and reach your left hand behind your back to hold onto the other end of the strap.
Steps 7: Straighten your spine and gently draw your shoulder blades toward each other. Hold the posture, breathing deeply and evenly. Keep your neck relaxed and gaze forward.
Steps 8: Hold the pose for a few breaths, maintaining a steady breath. Feel the stretch across your shoulders, chest, and arms.
Steps 9: To release the pose, gently release your hands and straighten your legs. Shake out your legs and then switch the cross of your legs, bringing your right knee on the bottom and left knee on top. Repeat the pose on the other side.
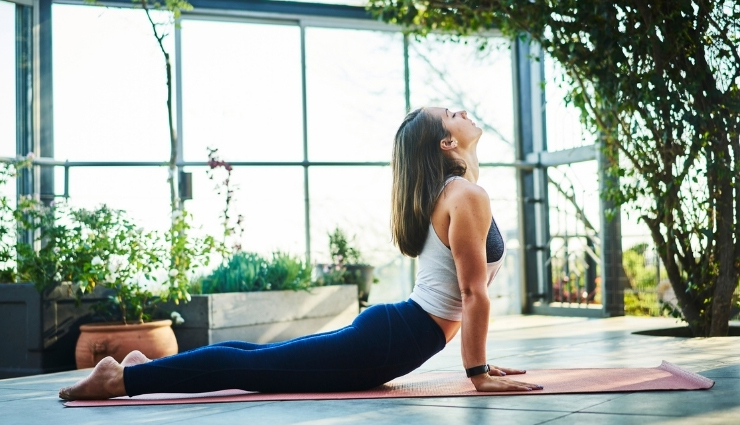
# Bhujangasana
Steps 1: Begin by lying flat on your stomach (prone position) on a yoga mat or a comfortable surface. Keep your legs together and the tops of your feet pressing into the ground.
Steps 2: Position your palms on the mat beside your shoulders, fingers pointing forward. Your elbows should be close to your body.
Steps 3: Press the tops of your feet and thighs into the mat. Engage your leg muscles and keep your pubic bone grounded.
Steps 4: Inhale deeply. As you breathe in, slowly lift your chest off the mat. Use the strength of your back muscles, not your arms, to lift. Keep your elbows slightly bent.
Steps 5: Keep your neck in a neutral position or gently tilt your head back. Avoid straining your neck; your focus should be on lengthening the spine. Your gaze can be directed upward or straight ahead, depending on your comfort level.
Steps 6: Keep your lower ribs on the ground and maintain a slight backbend in your spine. Avoid over-arching your back, which can compress your lower back.
Steps 7: Hold the pose for a few breaths, breathing deeply and evenly. Feel the stretch in your abdomen and the opening of your chest. Relax your shoulders away from your ears.
Steps 8: Slowly exhale and lower your chest back to the mat. Rest your forehead on the mat and relax your arms alongside your body. Take a few breaths in this position.
Steps 9: You can either repeat Bhujangasana for another round or move into a different yoga posture. If you're practicing a sequence, follow the instructions of your yoga routine.
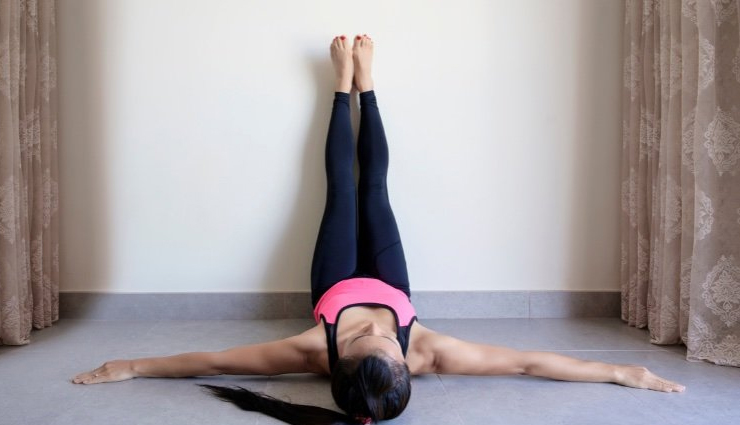
# Viparita Karani
Steps 1: Find a quiet, clear wall space. Place a folded blanket or a bolster about 5-6 inches away from the wall. Sit sideways on the support, with your knees bent and your hip close to the wall.
Steps 2: Swing your legs up onto the wall and simultaneously lower your upper body onto the ground. Your sitting bones should be as close to the wall as possible. Your legs should be straight up, resting against the wall. Adjust your position so that your body forms an L-shape.
Steps 3: Scoot your buttocks as close to the wall as comfortable. You can slightly maneuver your body to find the most comfortable position. Your arms can be placed by your sides, palms facing up, or on your abdomen for a grounding effect.
Steps 4: Allow your shoulders and head to rest on the floor. Close your eyes and breathe deeply. Relax your facial muscles, jaw, and throat. Soften your gaze and let go of any tension in your body.
Steps 5: Focus on your breath. Inhale deeply through your nose, allowing your abdomen to expand. Exhale slowly and completely. Continue to breathe deeply and mindfully. Feel the gentle stretch in your hamstrings and the relaxation in your lower back.
Steps 6: Hold this pose for 5 to 15 minutes, or longer if you're comfortable. Focus on your breath and the sensations in your body. Let the pose calm your mind and relieve any stress or tension.
Steps 7: To come out of the pose, gently bend your knees, bringing them toward your chest. Roll to one side in a fetal position, and stay there for a few breaths. Use your hands to press yourself up to a seated position.
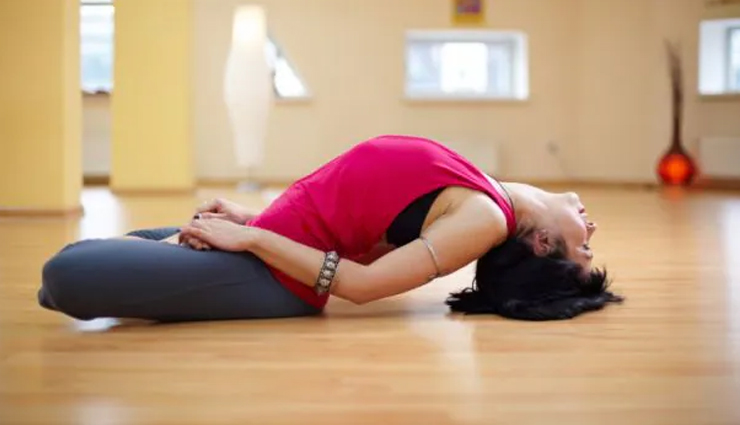
# Matsyasana
Steps 1: Start by lying flat on your back (supine position) on a yoga mat. Place your arms alongside your body, palms facing down.
Steps 2: Slide your hands under your hips, palms facing down. As you slide your hands, press your forearms and elbows into the mat. This will lift your chest slightly.
Steps 3: Inhale deeply, press down through your forearms and elbows, and lift your upper torso and head away from the ground. Arch your back and place the crown of your head on the mat. Your weight should be supported by your forearms, elbows, and a little on your head, not on your neck.
Steps 4: Continue to arch your back, lifting your chest toward the ceiling. Keep your thighs and legs active by pressing them down into the mat. Point your toes.
Steps 5: Tilt your head back so that the top of your head is resting lightly on the mat. Avoid putting excessive pressure on your neck. Your neck should be relaxed, and there should be a gentle stretch in your throat.
Steps 6: Hold the pose for a few breaths, breathing deeply and comfortably. Feel the stretch in your chest and throat. Keep your breathing smooth and steady.
Steps 7: To come out of the pose, gently lift your head off the ground, tuck your chin to your chest, and slowly lower your upper body back to the mat. Release your arms from underneath you and lie flat on your back in a relaxed position.


