- Home›
- Healthy Living›
- 7 Effective Yoga Poses To Treat Allergic Rhinitis
7 Effective Yoga Poses To Treat Allergic Rhinitis
By: Priyanka Maheshwari Fri, 15 Sept 2023 4:53:29
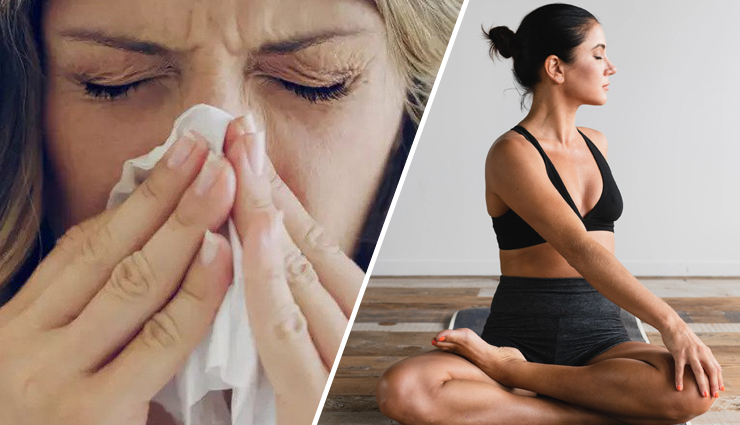
If you're wondering about the effectiveness of yoga for relieving allergic rhinitis symptoms, rest assured that specific yoga poses can indeed provide significant relief from nasal congestion and inflammation.
Allergic rhinitis occurs when you encounter certain airborne allergens, leading to uncomfortable symptoms like an itchy throat and persistent sneezing, which can be quite distressing.
In this article, we've compiled a list of seven highly effective yoga poses that can help you manage this inflammatory condition effectively. Let's dive right in!
To begin our exploration, let's first understand what allergic rhinitis entails, shall we?
Allergic rhinitis is a prevalent issue in urban environments, causing inflammation and heightened sensitivity in your nasal passages. This condition arises due to exposure to allergens like dust or pollen.
When your body comes into contact with these allergens, your immune system produces histamine, resulting in unpleasant side effects such as itchy eyes and a runny nose.
Additionally, environmental factors such as pollutants, stress, and poor dietary choices can make your respiratory and nervous systems more susceptible to allergic rhinitis.
Allergic rhinitis affects individuals of all ages, impacting both children and adults. Globally, approximately 10% to 30% of adults suffer from this condition, while it affects around 40% of children.
In 2019, a cross-sectional study was conducted in 21 primary schools to examine the prevalence and associated risk factors of allergic rhinitis. The study employed questionnaires based on the International Study of Asthma and Allergies in Childhood, revealing a cumulative allergic rhinitis prevalence of 36.2% among the 3,836 children aged 6 to 12 years in Budapest.
The allergen responsible for allergic rhinitis is an external substance, with pollen being a common culprit. Your body's response to this allergen is referred to as an allergy or allergic rhinitis.
Allergic rhinitis is also commonly known as hay fever, characterized by symptoms such as a runny nose, watery eyes, swelling, sneezing, coughing, sore throat, dark circles under the eyes, headaches, skin rashes, and fatigue.
Within minutes of exposure to allergens, your body reacts, affecting your sleep patterns, productivity, and concentration.
Allergic rhinitis can be categorized into seasonal and perennial types. Seasonal allergic rhinitis typically occurs during spring and fall, primarily due to outdoor allergens like pollen. In contrast, perennial allergic rhinitis can manifest at any time of the year due to indoor allergens such as dust and pet dander.
Your risk of developing allergic rhinitis is higher if you have a family history of the condition, and the presence of asthma also increases your susceptibility.
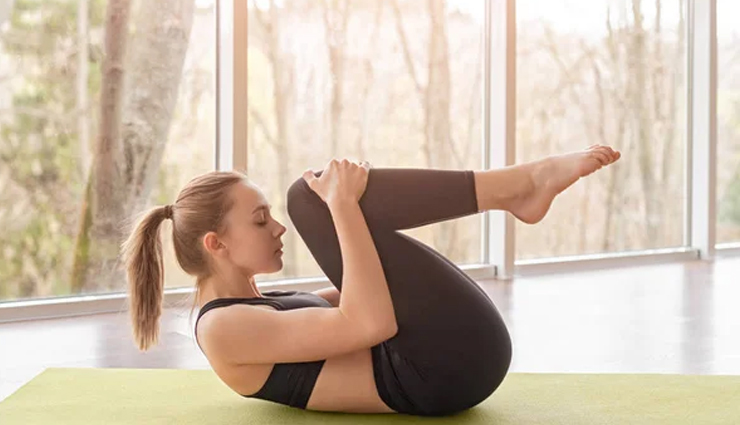
# Pavanamuktasana
Pavanamuktasana, also known as Wind-Relieving Pose, is a yoga asana that can help relieve gas and bloating while also improving digestion. Here are the steps to performPavanamuktasana
- Begin by lying flat on your back on a yoga mat. Keep your legs extended and your arms alongside your body, with your palms facing down.
- Inhale deeply. As you exhale, bend your right knee and bring it toward your chest.
- As you bring your knee in, interlock your fingers just below your right knee. Clasp your hands together, holding your knee in place.
- Use your hands to gently hug your right knee to your chest. Your left leg should remain straight and relaxed on the mat.
- If comfortable, lift your head and chest slightly off the mat and bring your nose toward your knee. Keep your left leg on the mat.
- Hold the pose for a few deep breaths, allowing your breath to massage your abdominal area.
- Exhale and release your head and chest back to the mat.
- Release your right leg and return it to the extended position.
- Repeat the same sequence with your left leg, bending the knee, hugging it to your chest, and optionally lifting your head and chest.
- After doing the pose with both legs separately, you can also bring both knees toward your chest at the same time, hugging them together.
- Release both legs and bring them back to the extended position.
- Lie flat on your back with your arms and legs extended, taking a few deep breaths to relax.
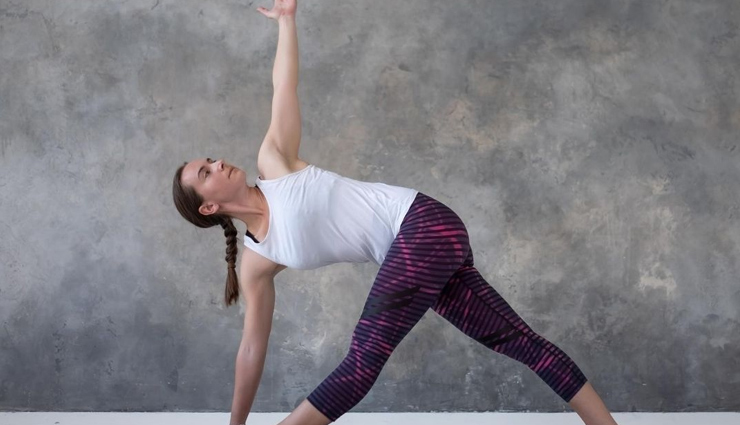
# Trikonasana
Trikonasana, also known as Triangle Pose, is a foundational yoga pose that involves a deep stretch and strengthening of the legs and the opening of the hips and chest. Here are the steps to perform Trikonasana:
- Begin in Tadasana (Mountain Pose), standing at the top of your yoga mat with your feet together and arms at your sides.
- Step your feet apart, about 3 to 4 feet, keeping them parallel to each other.
- Turn your right foot out 90 degrees so your toes point to the short edge of the mat.
- Align your left heel with your right heel, turning your left foot slightly inwards.
- Inhale and extend your arms out to the sides, parallel to the ground, with your palms facing down.
- Exhale and hinge at your right hip, moving your torso to the right while keeping your spine long and chest open.
- Reach your right hand down, placing it on your right shin, ankle, or the floor on the outside of your right foot (use a yoga block if needed).
- Inhale and extend your left arm straight up towards the ceiling, creating a straight line from your left heel to your left fingertips.
- Turn your head to gaze at your left hand if comfortable, or look straight ahead or down if you have neck issues.
- Hold the pose for 30 seconds to 1 minute, maintaining a strong and engaged core, and breathing steadily.
- Inhale and engage your core to lift your torso back up to the center.
- Bring your arms back to shoulder height and align your feet parallel to each other.
- Repeat the same steps on the left side, turning your left foot out and your right foot slightly inwards.
- Inhale and return to the center, bringing your feet together in Tadasana.
- Exhale and relax your arms by your sides.

# Vrikshasana
Vrikshasana is a balance pose that not only strengthens your leg muscles but also improves concentration and balance. Focus on your breath and a steady gaze to help maintain your balance throughout the pose.
- Begin in Tadasana (Mountain Pose), standing tall with your feet together, arms at your sides, and palms facing forward.
- Shift your weight onto your right foot, grounding it firmly into the mat.
- Bend your left knee and lift your left foot off the ground.
- Place the sole of your left foot on the inner right thigh, pressing it against the inner thigh while avoiding the knee joint. Your toes should point downward, and your left heel should be close to your perineum.
- Find your balance and ensure that your hips are level. Engage your core for stability.
- Inhale and bring your hands together in a prayer position at your heart center, with your elbows pointing outward.
- Fix your gaze on a stationary point in front of you to help with balance and concentration.
- Hold Vrikshasana for 30 seconds to 1 minute or longer, maintaining steady breaths and a calm mind.
- Exhale as you release your hands and gently lower your left foot back to the mat.
- Return to Tadasana, standing with your feet together and arms at your sides.
- Repeat the pose on the other side by shifting your weight to your left foot and placing your right foot on your inner left thigh.
- Inhale, bring your hands to prayer position, and hold the pose as you did on the first side.
- Exhale and release, returning to Tadasana.
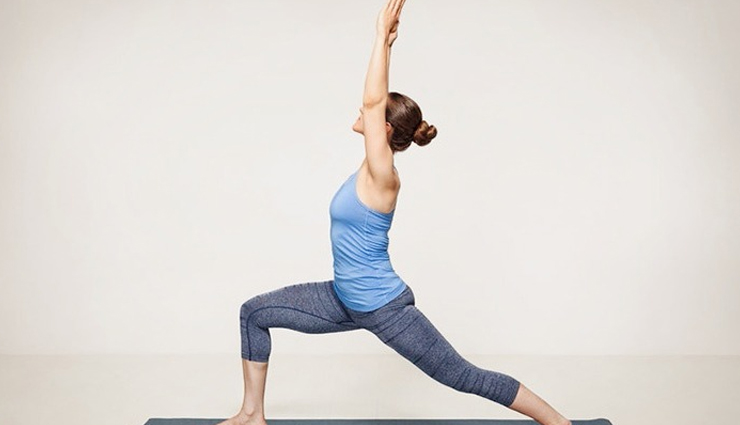
# Virabhadrasana I
Virabhadrasana I, also known as Warrior Pose I, is a foundational yoga pose that builds strength, stability, and focus. Here are the steps to perform Virabhadrasana I:
- Start in Tadasana (Mountain Pose), standing with your feet together and arms at your sides.
- Step your left foot back about 3 to 4 feet, keeping your feet aligned heel to heel.
- Turn your left foot out at a 45-degree angle, pointing your left toes toward the top left corner of your mat.
- Square your hips to the front of the mat by rotating your torso slightly to the right.
- Inhale deeply and bend your right knee deeply, ensuring it's directly over your right ankle, creating a right angle with your right thigh parallel to the floor.
- Simultaneously, raise your arms overhead, reaching them up toward the ceiling with your palms facing each other. Keep your arms alongside your ears.
- Maintain a steady and focused gaze (drishti) forward, looking past your right fingertips.
- Hold the pose for 30 seconds to 1 minute, keeping your core engaged, your back leg strong, and your breath steady.
- To release the pose, exhale as you lower your arms and straighten your right leg.
- Step your left foot forward to meet your right foot, returning to Tadasana.
- Repeat the same sequence on the other side, stepping your right foot back and bending your left knee deeply.
- Exhale and release, stepping your right foot forward to return to Tadasana.
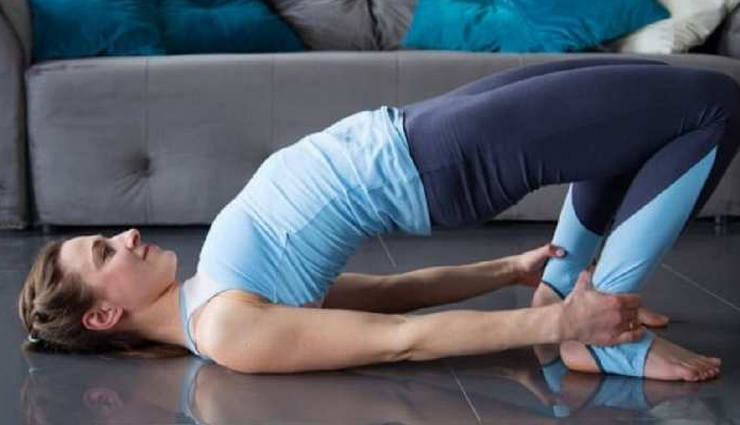
# Sethu Bandhasana
Sethu Bandhasana, also known as Bridge Pose, is a yoga asana that helps strengthen the back, legs, and buttocks while also improving flexibility. Here are the steps to perform Sethu Bandhasana:
- Start by lying flat on your back on a yoga mat with your arms resting alongside your body, palms facing down.
- Bend your knees and place your feet flat on the floor, hip-width apart, and close to your buttocks.
- Ensure your feet are parallel to each other, pointing forward, with ankles and knees aligned.
- Keep your arms alongside your body, palms facing down, and fingertips lightly touching your heels.
- Inhale and press your feet and palms into the floor as you lift your hips and lower back off the mat.
- Engage your glutes and core muscles for support, keeping your thighs parallel to each other.
- Optionally, roll your shoulders underneath you, interlace your fingers, and create a bridge with your arms, while keeping your upper arms and shoulders on the mat.
- Open your chest by drawing your shoulder blades toward each other, expanding your chest.
- If comfortable, tuck your chin gently toward your chest, lengthening the back of your neck.
- Hold Sethu Bandhasana for 30 seconds to 1 minute, breathing deeply and steadily.
- Exhale as you release the pose. If your hands are interlaced, unclasp them and roll your spine down slowly, one vertebra at a time.
- Rest for a moment with your knees bent and feet on the floor to allow your spine to return to its natural curve.
- You can repeat Sethu Bandhasana for an additional 1-2 times if desired.
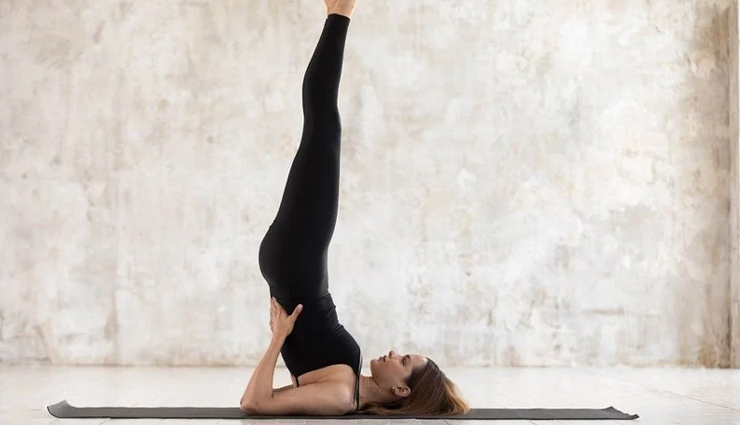
# Salamba Sarvangasana
Salamba Sarvangasana, also known as Supported Shoulderstand, is an intermediate to advanced yoga pose that involves balancing on your shoulders with your legs extended upward. Here are the steps to perform Salamba Sarvangasana:
- Prepare your props by placing a folded yoga blanket or mat on the floor and having a yoga bolster nearby.
- Begin by lying on your back with your arms alongside your body, palms facing down.
- Inhale deeply and lift your legs off the floor, bringing them perpendicular to the ground, feet together and toes pointed.
- Place your hands on your lower back for support, with your elbows on the floor, shoulder-width apart.
- Press your hands into your lower back and lift your hips off the floor.
- Continue lifting your hips and bring your legs over your head toward the floor behind you.
- Once your legs are overhead, place the yoga bolster or folded blanket under your hips for additional support.
- Straighten your legs, pointing your toes upward, creating a straight line from your shoulders to your feet.
- If needed, use your hands to support your upper back, allowing your elbows to rest on the floor.
- Keep your neck in a neutral position by looking toward your chest or, if comfortable, gazing toward your toes.
- Hold Salamba Sarvangasana for 30 seconds to 2 minutes, breathing deeply and steadily.
- To release the pose, bend your knees and lower your feet to the floor behind you.
- After releasing the pose, lie flat on your back in Savasana (Corpse Pose) for a few breaths to relax and recover.
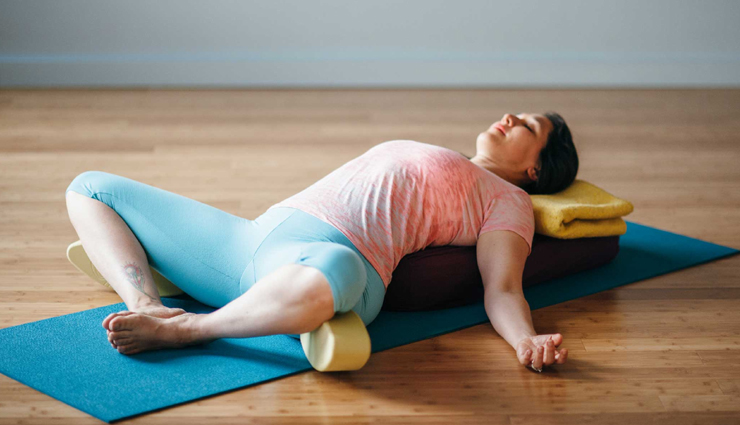
# Supta Baddha Konasana
Supta Baddha Konasana, also known as Reclining Bound Angle Pose or Butterfly Pose, is a restorative yoga pose that helps open the hips and chest while promoting relaxation. Here are the steps to perform Supta Baddha Konasana:
- Start in a seated position on your yoga mat with your legs extended straight in front of you.
- Bend your knees and bring the soles of your feet together, allowing your knees to fall outward, creating a diamond shape with your legs.
- Place a cushion or bolster underneath your lower back to provide support for your spine and pelvis.
- Gently recline back, using your hands to support your weight as you lower yourself onto the cushion or bolster. Ensure your head and upper back are comfortably supported.
- Relax your arms alongside your body, with your palms facing up, and let your elbows rest on the floor.
- Allow your knees to fall open to the sides, opening your hips and creating a diamond shape with your legs.
- Close your eyes and take slow, deep breaths, allowing your body to relax into the pose. Focus on releasing tension in your hips and groin area.
- Hold Supta Baddha Konasana for 5 to 10 minutes or longer, using this time for deep relaxation and introspection.
- To exit the pose, gently slide your feet together, then roll to one side and push yourself up to a seated position.


