- Home›
- Healthy Living›
- 7 Effective Yoga Poses To Help You Treat Epilepsy
7 Effective Yoga Poses To Help You Treat Epilepsy
By: Priyanka Maheshwari Fri, 15 Sept 2023 1:47:22
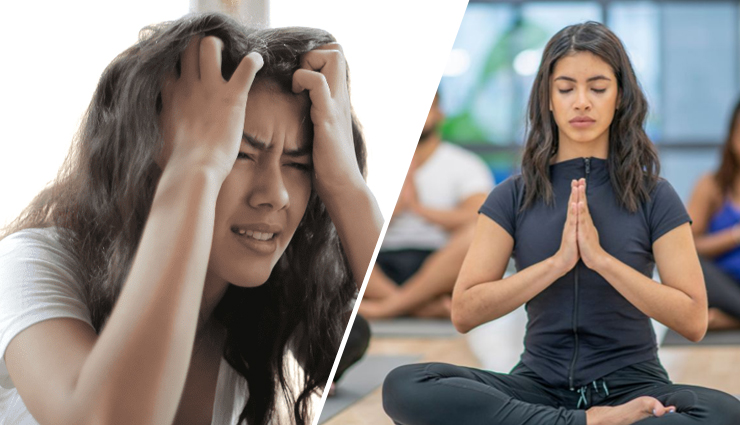
Epilepsy is a neurological disorder that has intrigued and puzzled humanity for centuries. It is characterized by recurrent, unprovoked seizures, which are sudden surges of electrical activity in the brain. These seizures can manifest in various forms, from momentary lapses in awareness to full-body convulsions, and their frequency can range from a single episode to multiple occurrences in a day.
This condition affects millions of people worldwide, making it one of the most common neurological disorders globally. Epilepsy does not discriminate; it can develop at any age and affect individuals from all walks of life. While the exact causes of epilepsy can vary, factors such as genetics, brain injuries, infections, or developmental disorders are often associated with its onset.
The impact of epilepsy extends beyond the seizures themselves. Many individuals with epilepsy face social stigmatization, limitations on their daily activities, and the need for ongoing medical care and treatment. Fortunately, advancements in medical science have led to a better understanding of epilepsy, improved diagnostic tools, and a variety of treatment options, including medications, surgery, and lifestyle management, to help individuals lead fulfilling lives despite their condition.
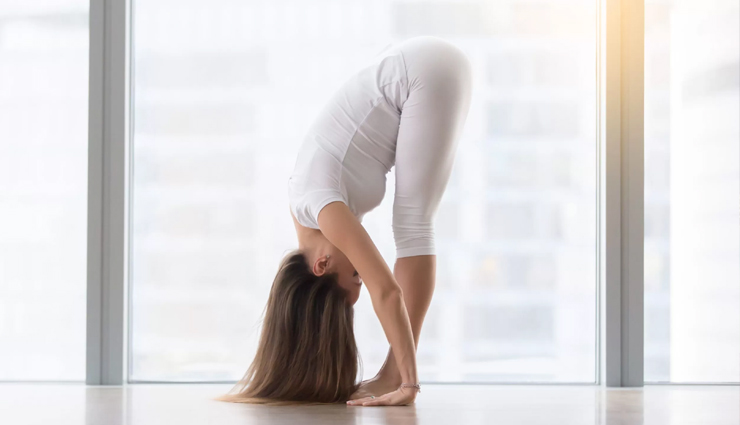
# Uttanasana
Uttanasana, also known as Standing Forward Bend Pose, is a yoga pose that involves bending forward from a standing position. Here are the steps to perform Uttanasana:
- Begin by standing upright in Tadasana (Mountain Pose) with your feet hip-width apart.
- Ensure that your feet are parallel to each other and your weight is evenly distributed between them.
- Inhale deeply and elongate your spine. Roll your shoulders back and down, opening your chest.
- On an exhale, engage your core muscles, and slowly begin to hinge at your hips.
- Keep your back straight as you fold forward at the hips. Lead with your chest, not your head.
- Bring your hands down toward the floor. You can bend your knees slightly if needed to reach the floor.
- If your flexibility allows, place your palms or fingertips on the floor beside your feet. If not, you can place your hands on your shins or thighs.
- Allow your head and neck to relax. Your gaze should be directed toward your legs.
- Feel the stretch along the back of your legs, particularly in your hamstrings and calf muscles.
- Try to straighten your legs as much as possible, but it's okay to keep a slight bend in the knees if you're not very flexible.
- Take several deep breaths in this position, allowing your body to relax into the stretch.
- Hold the pose for 30 seconds to 1 minute or longer, depending on your comfort and flexibility.
- To come out of the pose, bend your knees slightly if they aren't already, engage your core, and slowly roll up to a standing position, one vertebra at a time.
- As you return to the upright position, let your head and arms hang loosely.
- Finish in the same Tadasana (Mountain Pose) as the starting position.
Tips:
- If you have lower back issues or are very inflexible, you can perform this pose with a slight bend in the knees.
- Avoid this pose if you have high blood pressure, glaucoma, or any recent injuries to the back or legs.
- Uttanasana is often used as a transition pose in yoga sequences and can be incorporated into various yoga practices and routines for flexibility and relaxation.
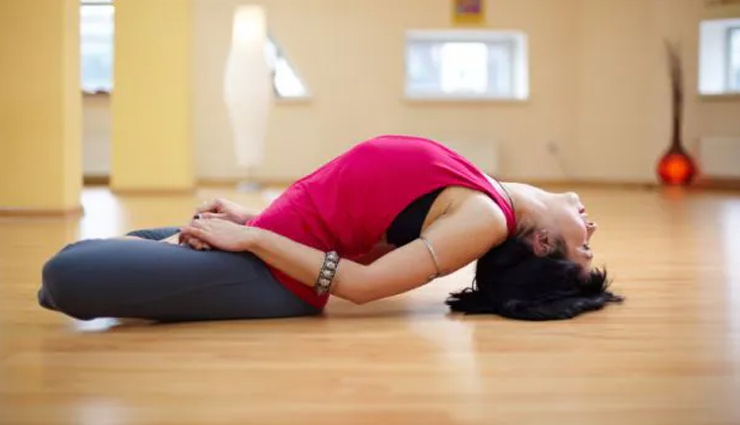
# Matsyasana
Matsyasana, also known as Fish Pose, is a yoga pose that involves arching the back while lying on the floor. Here are the steps to perform Matsyasana:
- Begin by lying flat on your back on a yoga mat or a comfortable surface. Extend your legs straight out and place your arms alongside your body, palms facing down.
- Slide your hands, palms down, under your hips and buttocks. Position them as close to your body as possible, with your elbows tucked in.
- Press your forearms and elbows firmly into the ground. This will lift your upper body and create an arch in your back.
- As you press into your forearms and elbows, gently lift your chest upward, arching your back.
- Tilt your head back and allow the top of your head to touch the ground. Your weight should be supported by your forearms, elbows, and head.
- Continue to lift your chest and upper torso as high as comfortably possible. You should feel a gentle stretch in your neck and throat.
-Take deep, slow breaths in this position, and hold the pose for about 15-30 seconds, or as long as it feels comfortable.
- To come out of the pose, gently lift your head off the ground, release the pressure on your forearms and elbows, and lower your upper body back down to the mat.
- Remove your hands from under your hips and straighten your legs.
- Lie flat on your back with your arms by your sides, palms facing up, and take a few deep breaths to relax and let go of any tension.
Tips:
- Matsyasana is often used as a counterpose to shoulderstand (Sarvangasana) in yoga practice.
- It's important to keep the weight on your forearms and elbows to avoid straining your neck.
- If you have any neck or back injuries or discomfort, consult a yoga instructor or healthcare professional before attempting Matsyasana.
- Matsyasana is also known for its potential to open the chest and throat, which can help with respiratory conditions and improve posture.
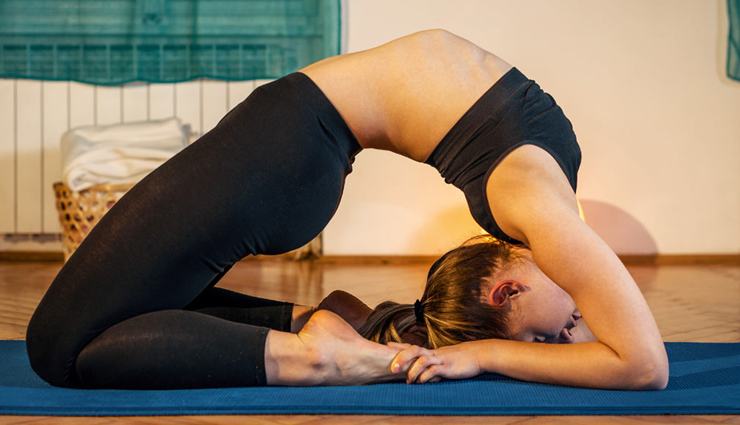
# Kapotasana
Kapotasana, also known as Pigeon Pose, is an advanced yoga asana that requires flexibility and strength. Here are the steps to perform Kapotasana:
- Begin by coming to a kneeling position on your yoga mat.
- Bring your knees together and your feet hip-width apart.
- Slide your right knee forward and place it behind your right wrist. Your right ankle should be in front of your left hip.
- Your right shin should be at a diagonal angle to your body.
- Extend your left leg straight back behind you, keeping the top of your foot and toes pointing down.
- Your left thigh should be parallel to the long edge of your mat.
- Square your hips as much as possible by ensuring that your right hip is in line with your left hip.
- Flex your right foot to protect your knee.
- Place your hands on the floor on either side of your hips, fingertips pointing forward.
- Press into your hands to lift your chest and elongate your spine.
- Inhale deeply and lift your chest upward as you engage your core muscles.
- Exhale as you slowly start to walk your hands forward, bringing your torso toward the floor.
- Keep your hips square and your back leg straight.
- Continue to walk your hands forward, bringing your chest and forehead to the floor, or as close to the floor as you can comfortably go.
- Your arms should be extended forward.
- Take deep breaths in this position, relaxing into the stretch.
- Hold the pose for 30 seconds to 1 minute or longer, as per your comfort and flexibility.
- To come out of the pose, walk your hands back towards your hips.
- Lift your torso and slide your right knee back, returning to the kneeling position.
- Repeat the pose on the opposite side by bringing your left knee forward and extending your right leg back.
Tips:
- Kapotasana is a deep hip opener and backbend. It may take time to develop the flexibility and strength required for the full expression of the pose. Be patient and practice regularly.
- If you have any knee, hip, or back injuries, consult with a yoga instructor or healthcare professional before attempting Kapotasana.
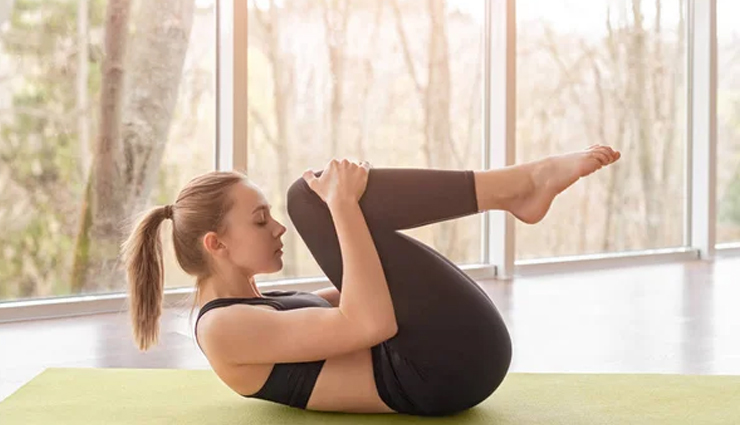
# Pavanamuktasana
Pavanamuktasana, also known as Wind-Relieving Pose, is a yoga asana that can help relieve gas and bloating while also improving digestion. Here are the steps to performPavanamuktasana
- Begin by lying flat on your back on a yoga mat. Keep your legs extended and your arms alongside your body, with your palms facing down.
- Inhale deeply. As you exhale, bend your right knee and bring it toward your chest.
- As you bring your knee in, interlock your fingers just below your right knee. Clasp your hands together, holding your knee in place.
- Use your hands to gently hug your right knee to your chest. Your left leg should remain straight and relaxed on the mat.
- If comfortable, lift your head and chest slightly off the mat and bring your nose toward your knee. Keep your left leg on the mat.
- Hold the pose for a few deep breaths, allowing your breath to massage your abdominal area.
- Exhale and release your head and chest back to the mat.
- Release your right leg and return it to the extended position.
- Repeat the same sequence with your left leg, bending the knee, hugging it to your chest, and optionally lifting your head and chest.
- After doing the pose with both legs separately, you can also bring both knees toward your chest at the same time, hugging them together.
- Release both legs and bring them back to the extended position.
- Lie flat on your back with your arms and legs extended, taking a few deep breaths to relax.
Tips:
- While performing Pavanamuktasana, focus on your breath and relax into the pose.
- If you have lower back issues, you can keep your head on the ground and focus on hugging your knees to your chest.
- This pose is also beneficial for massaging the abdominal organs, which can help with digestion.
- If you experience discomfort or pain while doing the pose, release immediately and consult a yoga instructor or healthcare professional for guidance.
- You can repeat this asana several times, hugging each knee to your chest for a few breaths before releasing.
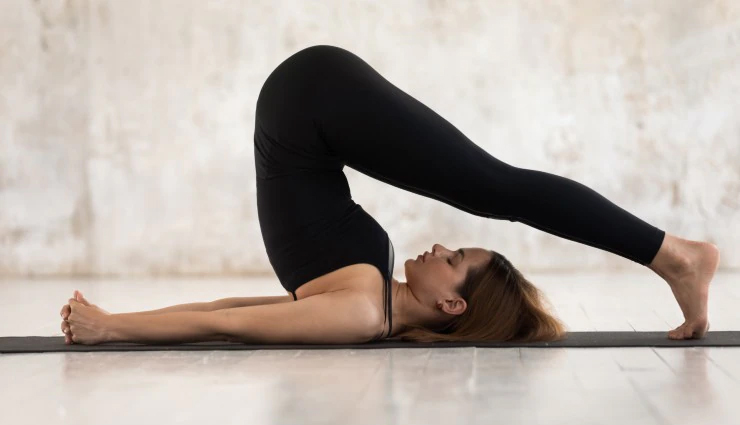
# Halasana
Halasana, also known as Plow Pose, is a yoga asana that involves lying on your back and lifting your legs over your head to create a plow-like shape. Here are the steps to perform Halasana:
- Begin by lying flat on your back on a yoga mat with your legs fully extended and your arms alongside your body, palms facing down.
- Place your hands, palms down, on the floor next to your body. Keep your arms straight and in line with your torso.
- Engage your core muscles to stabilize your spine.
- Inhale deeply. As you exhale, use your core strength to lift both legs off the ground.
- Keep your legs together and straight.
- Continue lifting your legs over your head, allowing them to move beyond the vertical plane. Your toes should point toward the floor behind you.
- Ideally, your toes will touch the ground behind you, but it's okay if they don't reach the floor in the beginning. Keep your legs straight and active.
- Support your lower back with your hands. Place your hands on your lower back, fingers pointing upward, to provide stability.
- Hold the pose while taking slow and deep breaths. Keep your neck relaxed and avoid turning your head.
- To come out of Halasana, slowly and carefully roll your spine back down to the mat, one vertebra at a time.
- Once your feet touch the ground behind your head, release your hands from your lower back.
- After exiting the pose, rest for a few breaths with your legs extended and your arms alongside your body.
Tips:
- Halasana should be avoided if you have any neck or spine injuries or conditions like cervical spondylosis.
- If you're a beginner, you can place a folded blanket or cushion under your shoulders to provide extra support during the pose.
- Use your core strength to lift your legs and avoid using momentum.
- It's essential to maintain awareness of your body and alignment while practicing Halasana to prevent strain or injury.
- Gradually work on increasing the duration you hold the pose as you become more comfortable with it.
- If you experience any discomfort or pain during the pose, exit it immediately and consult a yoga instructor or healthcare professional.

# Salamba Sirsasana
Salamba Sirsasana, also known as Supported Headstand or King of Asanas, is an advanced yoga pose that involves balancing on your head and forearms. This pose should be practiced with caution and under the guidance of an experienced yoga instructor, especially if you're a beginner. Here are the steps to perform Salamba Sirsasana:
- Begin by setting up your yoga mat in a clear, open space. Kneel on the mat with your forearms resting on the floor, parallel to each other.
- Interlace your fingers, forming a cup with your hands.
- Place your elbows directly under your shoulders, ensuring they are shoulder-width apart.
- Place the crown of your head on the mat between your cupped hands. Your head should be gently cradled in your hands, not resting on the forehead or the back of the head.
- Lift your hips upward and walk your feet closer to your upper body.
- Bend your knees, bringing them toward your chest.
- On an exhale, engage your core muscles and slowly begin to lift your knees off the ground. At this point, your feet are still on the mat.
- Continue to engage your core, and as you inhale, lift both legs off the mat, bringing them toward the ceiling.
- Keep your legs straight and aligned with your torso.
- Find your balance in the pose, with your weight supported by your forearms and head. Your body should form a straight line from head to heels.
- Hold Salamba Sirsasana for as long as is comfortable, taking slow and steady breaths.
- Beginners may start with short holds and gradually increase the duration as they become more comfortable and stable in the pose.
- To come out of the pose, lower your legs slowly and with control, returning them to the mat.
- Allow your knees to rest on the mat in a kneeling position and then sit back on your heels to rest.
Tips:
- Practice this pose under the guidance of a certified yoga instructor, especially if you're a beginner, to ensure proper alignment and safety.
- Avoid any sudden movements or excessive force while entering or exiting the pose.
- Never twist or turn your neck while in headstand; always keep your neck in a neutral position.
- Use a wall for support and balance if you're new to Salamba Sirsasana. This can help you feel more secure and confident.
- It's important to engage your core muscles throughout the pose to provide stability and support for your spine.
- If you experience discomfort or pain, exit the pose immediately and seek guidance from a yoga instructor or healthcare professional.
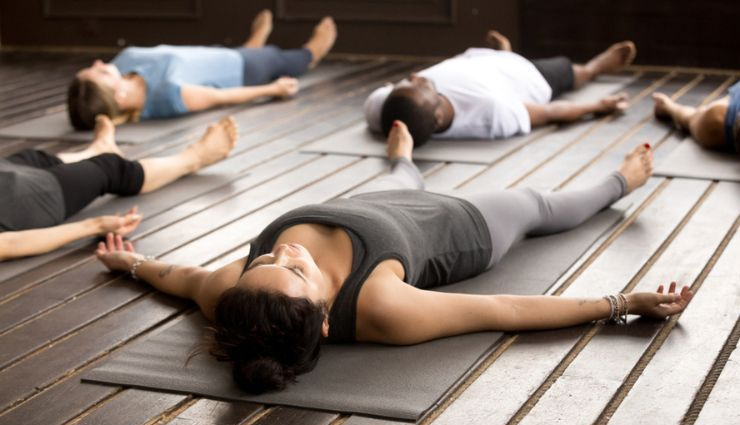
# Savasana
Savasana, also known as Corpse Pose, is a fundamental yoga relaxation pose that promotes deep relaxation and rejuvenation. Here are the steps to perform Savasana:
- Begin by laying down on your yoga mat with your legs extended straight and your arms resting alongside your body.
- Ensure your body is in a straight line, and your feet are hip-width apart. Your palms should be facing up.
- Close your eyes gently and take a few deep, slow breaths to begin to relax your body.
- Start at the top of your head and progressively work your way down through your body, focusing on each part and consciously relaxing it.
- Relax your forehead, release any tension in your eyebrows, and let go of any tension in your eyes, cheeks, and jaw.
- Relax your neck, allowing it to become soft and tension-free.
- Roll your shoulders back and down to release any tension. Feel your shoulder blades sinking into the mat.
- Let your upper arms, forearms, and hands become completely relaxed. Your fingers should naturally curl in a relaxed manner.
- Allow your chest to relax, and feel your ribcage expanding and contracting with each breath.
- Let go of any tension in your abdomen, and let it rise and fall with your breath.
- Relax your hips, thighs, and knees. Release any tension in your calves, shins, and ankles.
- Allow your feet to fall open, and let your toes relax.
- Pay attention to your breath. Breathe naturally and effortlessly.
- Feel the gentle rise and fall of your chest and abdomen with each breath.
- As thoughts arise, acknowledge them without judgment and let them pass, redirecting your attention to your breath.
- Stay in Savasana for at least 5-10 minutes or longer if you like.
- Remain completely still and relaxed, allowing your body and mind to experience deep relaxation.
- To exit the pose, start by gently wiggling your fingers and toes.
- Gradually, roll to one side into a fetal position, keeping your eyes closed.
- Take a few breaths in this fetal position before slowly and mindfully coming up to a seated position.
Tips:
- Savasana is a state of conscious relaxation, so focus on being fully present in the moment.
- Use a blanket or cushion under your head and a bolster or rolled-up blanket under your knees for added comfort if needed.
- The goal of Savasana is to achieve a deep state of relaxation, so avoid fidgeting or moving around during the practice.
- It's a good idea to set aside dedicated time for Savasana at the end of your yoga practice to fully reap its relaxation benefits.


